
iRacing Fixed Steering Wheel Setup
Steering wheel setup adjustments in the iRacing garage and option menus that frequently get overlooked especially when using fixed setups. Learn how to make the proper adjustments to improve lap times. Using these simple steering wheel adjustments will help get the vehicle to turn better and come off the corner quicker.
The steering wheel is a part of the overall steering system that has an effect on the steering box ratio. Steering wheel size (diameter) has a big influences on the input response time.
- Larger Rim – Slows input response time
- Smaller Rim – Quickens input responses time
Changing the steering wheel rim size can be good or bad depending on feel and response time desired. The steering wheel inputs react more quickly when using a smaller wheel rim size.
Using a steering wheel rim that is the same diameter as it is in the real car (for whatever vehicle) you want the steering box ratio to be at or near the same rate as the real car.
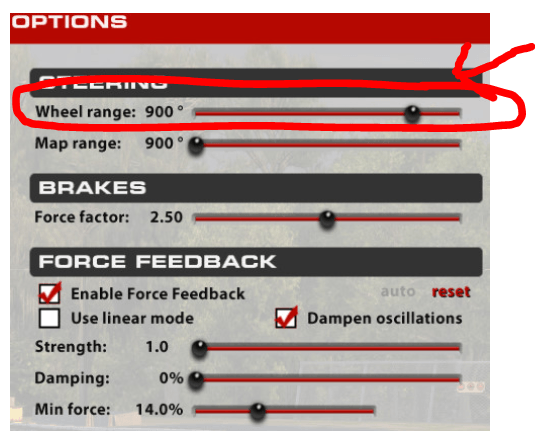
Steering Wheel Range
In iRacing the sim tries to replicate the proper steering wheel rotation for each vehicle. Making the wheel rotation and the actual steering lock 1:1 compared to the vehicle in real life except for the most extreme vehicles. This allows us to calibrate the sim racing steering wheel range to 900 degrees and leave it. No longer necessary to adjust the steering wheel range.
Setting the wheel range to anything less than 900 degrees of rotation (the top slider) means you will have to turn the physical wheel more than what the in game sim wheel requires. Meaning for every vehicle you drive in-sim, you’re driving with a decelerated steering ratio. This changes for each vehicle, as the simulated lock-lock degrees are different for every vehicle. So set the steering wheel range to 900 degrees and forget it.
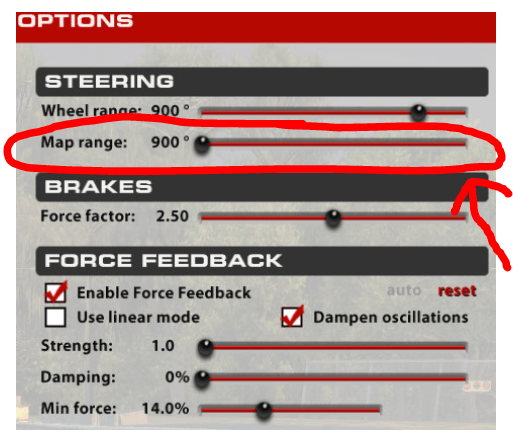
Steering Map Range
iRacing description of steering map range. Map from your wheel range to the virtual car’s range, if greater, to better support wheels with limited rotation. At slow speeds the mapped range will equal the range of the car, but we limit the car’s lock to lock at speeds to this value to help improve steering sensitivity.
In the sim try using the steering map range to help loosen the rear of the vehicle on corner exit. Coming off the corner when the rear of the vehicle will not slide out, this condition is referred to as tight off. To help loosen the rear of the vehicle, try increasing the wheel map range slider a little. Example, with the wheel range set to 900 degrees and map range 900 degrees. Move the slider to 935 or 975 degrees. What this does is help the rear of the vehicle slide a little causing a loose off condition. Experiment with this setting. The range of the slider can be increased to 1080 degrees. A lot of flexibility can be gained here. This allows you to unwind the steering wheel coming off the corner producing less tire wear and faster lap times.
Again when practicing or in a test session, experiment with the map range slider. Find the setting that will help with the tight or loose off conditions. Find what works best for you. Again don’t just run 2 to 3 lap segments looking for a fast lap, you need to run 15 to 20 lap segments. Always check the tire wear and lap time fall off. The goal should always be consistent lap times
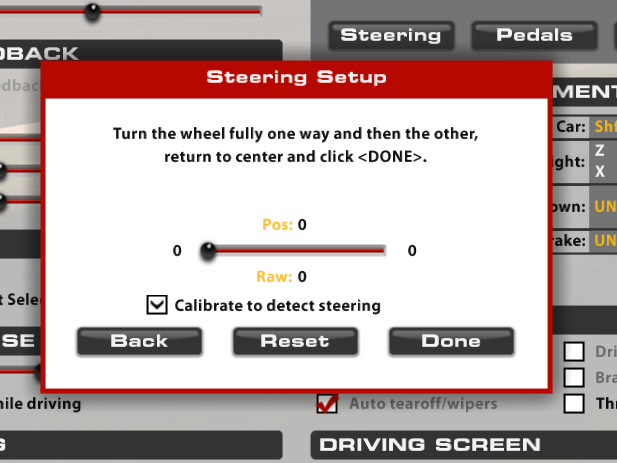
How To Calibrate Your Steering Wheel Range
The proper way to calibrate the steering wheel in iRacing. The calibration software wants you to go left to lock, right to lock then centering the wheel to 50% dead on the screen, hitting next, then turning left until it says the correct rotation your wheel software was set to. Example 900 degrees. In theory this makes the steering 1:1 enabling the actual steering lock for all vehicles except for the most extreme ones.
The problem is, what the game detects as your range, center and 90*, is only by numerical estimates. Depending on type, quality of wheel, and many other factors, this may, make driving in a straight line and the wheel centered difficult. Actually the wheel will be off centered. The 90 degrees turn point may actually be anywhere from 80-100 degrees.
First go into the wheel setting software, and set the spring tension and dampener to off. This will allow the wheel freely in either direction, allowing the wheel to stay at any degree of rotation, while letting go of the steering wheel. This also will help ensure that the wheel can be calibrated properly. You can re-enable the spring tension and dampener later if you desire. These settings shouldn’t be used as they add a friction resistance to the wheel that really is not needed in sim.
Calibrate the wheel in iRacing. SLOWLY and GENTLY move the wheel to the left until it hits the stop or resistance. Don’t go past this resistance and this is the reason for going slow and being gentle. Repeat and do the same all the way to the right.
Now slowly return the wheel to the center, without worrying about the numbers displayed on the screen. PHYSICALLY CENTER THE WHEEL! Take your time and make sure that it LOOKS and FEELS centered.
This calibrates the wheel to utilize the proper lock to lock range. It also centers the wheel to what looks and feels centered to the person driving and not some arbitrary number.

The Turn Left 90 Degrees Step
There are two ways to set the 90 degree step.
Primary Method – Turn the wheel very slowly and gently to the left. When you reach the 900 degree rotation point displayed on the screen stop. You can literally let go of the wheel, and it will remain there until you select continue. This will now set the steering wheel and map range numbers to 900 degrees.
Alternative Method – Turn the wheel very slowly and gently to the 90 degrees to the left, without worrying about the numbers displayed on the screen. Stop turning when you reach the desired 90 degree point on the real steering wheel. Most wheels claim to be 900 degree wheels, but actually turn out to be 860 to 870 degrees or so. This will now set the steering wheel and map range numbers displaying the resulting degrees.
For both steps set the spring tension and dampener to off in software. This will allow the wheel move freely without any force fighting against you. Once you reach the desired 90 degree rotation point, you can literally let go of the wheel, and it will remain there until you select continue.
When your complete the calibration of the steering wheel, both ways, iRacing will now display the wheel and map ranges.
THE GARAGE
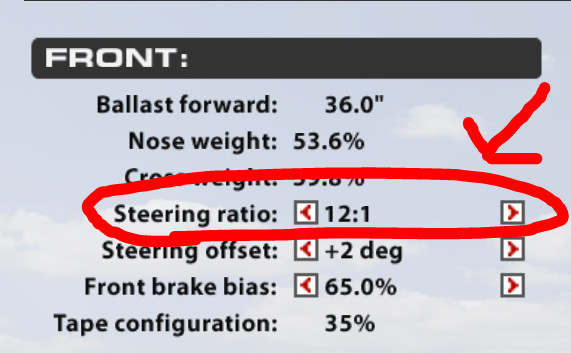
Steering Ratio – Effect on how fast the front tires turn
The steering box on a car has an input and output shafts on either end. On the input shaft side of the steering box the steering wheel is attached. The output shaft is connected to the steering rack. The steering box houses the gear train which determines the steering ratio.
The Ratio the difference in rotation between the input and output shafts of the steering box. Say we setup a 10:1 steering ratio box. What this means is for every 10 degrees of rotation of the input shaft (Steering Wheel) it will produce 1 degree of rotation on the output shaft. A 12:1 setup will produce 1 degree of rotation on the output shaft for every 12 degrees of rotation on the input shaft (Steering Wheel). The higher ratio produces a slower steering input response compared to a lower ratio.
Of all the options in the garage menu, the steering ratio is by far the most driver specific. Every driver knows the amount of steering wheel rotation they desire to get the vehicle to turn into a corner. It is a very specific muscle memory type of feel thing. The driver turns the steering wheel to a specific amount of rotation and the car turns too little or too much and they will complain until it this is adjusted.
A vehicle feeling “tight” or “loose” on corner entry is probably due to the expected input didn’t provide the anticipated result. It is important to understand that these adjustments will not change how much steering is necessary at the wheels to navigate a turn. Imagine the vehicle front tires need to turn at 20 degrees to go around the corner. The vehicle will always require that much steering regardless of what the steering settings are used. A 16:1 steering ratio setting will not provide any handling benefit or hindrance when compared to an 8:1 steering ratio, since both will still need to turn the wheels 20 degrees to get around the corner.
Now that you know how much the tire need to turn in a corner, you can adjust the steering ratio to suit how fast or slow the turning of the front tires you are comfortable with. There is a benefit to a higher steering ratio and that is tire wear on longer fuel runs. The higher ratio produces a slower steering input, which will help reduce tire scrubbing and may help with increased lap times and better tire wear. The higher ratio will also make the car less twitchy. A lower steering ratio produces faster steering input and better car control in a corner, but can be a little twitchier on the straight-aways. Again these settings are a driver feel thing. What works for one driver may not work for another.
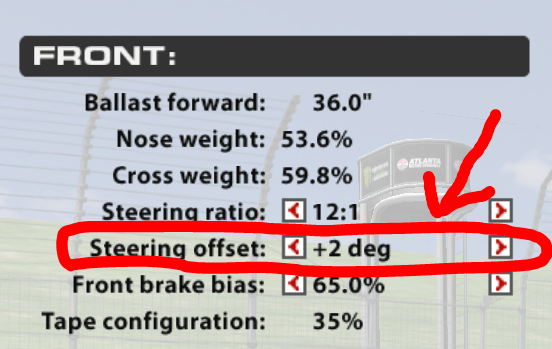
Steering Offset
Most vehicles are equipped with a splined steering shaft, allowing the driver to offset (repositioned) the steering wheel to the right or left. In the iRacing garage this is represented in plus or minus degrees. It is essentially the same as removing the steering wheel, rotating it, and snapping it back onto the steering shaft. Called steering offset, which is the amount of steering wheel rotation before re-attaching.
Mainly common in oval track racing, because the suspension is setup to make the car turn left. This make it the pull to the left, resulting in the steering wheel not being centered when driving in a straight line. Some drivers prefer to have a slight amount of steering wheel offset to the right when the car is going straight. Others may prefer the steering wheel completely centered or set slightly to the left, when going straight.
Steering wheel offset is also used in sim racing to help the vehicle get through a corner resulting in faster lap times. For qualifying try minus 6 degrees offset. On corner entry, this helps you turn the steering wheel less, allowing less tire scrub, resulting in a faster lap time. Try going no more than minus 10 degrees, but you need to experiment to match to your driving style.
Depending on the vehicle, track, conditions and driving technique most steering wheel offset settings will be range from minus 8 to plus 4. Again these are very track specific and need to be tested. Go out and run 15 -20 lap segments, then review the tire wear and lap times. Try running different offsets and see how it affects the tires and lap consistency. Remember what works for one driver may not work for another.
These adjustments may seem simple and insignificant, but these small details can make or break your race. Go to a test session, experiment with everything, and find what works best for you. Don’t just run 2 to 3 laps trying to get fast time on the board, you need to run 15 to 20 lap segments. Always check the tire wear and lap time fall off. The goal should always be consistent lap times with less tire wear.
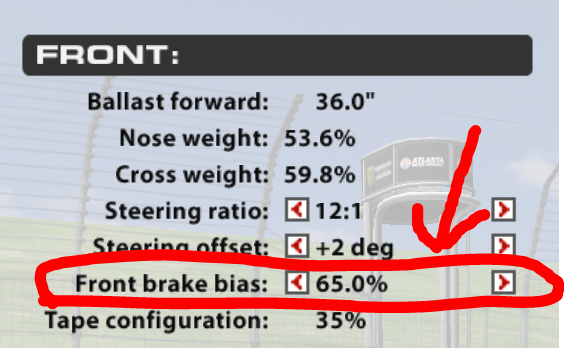
Front Brake Bias
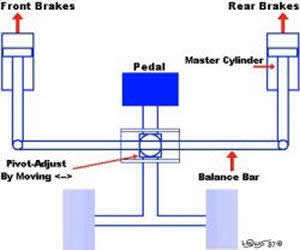
As a car decelerates, weight transfers to the front tires, improving front end grip. At the same time this weight transfer decreases the grip on the rear tires. The goal is to adjust the proportion of the braking forces between front and rear (brake bias) of the vehicle to maximize overall braking efficiency. When trail braking is employed, while turning into the corner, use the brake bias setting to help turn the car on entry to the corner.
The front brake bias setting in iRacing displays the percentage of the braking force applied to the front brakes. Example a brake bias setting of 60% in the garage. This means 60% of the braking force is sent to the front brakes while 40% is sent to the rear brakes.
Forward brake bias higher than 50% is common on cars that use equal-sized tires. This is due to the rear tires are being unloaded during deceleration. Formula cars with larger rear tires, like the Lotus 79 use a brake bias setting that is less than 50%. Due to the tremendous amount of rotating mass relative to the front tires. There is no right or wrong brake bias setting. This adjustment is very driver specific and use whatever is right for the car and track.
How Brake Bias Works
On corner entry, various driving styles cause the front and rear tires to load and unload differently. This leads to wheel lockup under heavy braking. The tire does not have to completely stop rotating during wheel lockup. The following concept is important to understand. The vehicle will begin to slide when any tire slows considerably, approaching lockup, relative to the other three tires.
Conditions Needed For Wheel Lockup
- Heavy Braking Torque – Can overcome the traction from the tire
- Wheel Brake Rotor – Produces a torque to counter forward rotation of the wheel
- Tire Traction – Produces a torque to counter the brakes
Resulting in one of the following:
- If The Tire Wins – Tire stays in contact with the pavement
- If The Brake Wins – Wheel lockup occurs
How To Set The Brake Bias
Find the setting that prevents wheel lockup on any of the tires during braking. This is very driver specific due to different driving styles and braking techniques. What works for one driver may not work for another.
One of the more difficult things to diagnose is when the brake bias setting is actually causing a corner-entry handling problem. Brake Bias is frequently confused with poor weight transfer and balance on corner entry. Sometimes a simple shift of the brake bias rearward is enough to alleviate the issue thus helping the car turn into the corner better.
- Increasing Front Bias: Going to a larger number, increases braking force to the front tires. Increases understeer making the vehicle “Tight” on corner entry and helps stabilize it in the braking zone
- Reducing Front Bias: Going to a smaller number, increases braking force to the rear tires. Increases oversteer making the vehicle “Loose”, helping the vehicle turn in on corner entry
Brake Force Factor
IRacing description of brake force factor. Adjust to control your brake response to pedal input. Suggested values are 1.6 – 2.0 for potentiometer and spring brake pedals. 0.0 for linear pressure sensing like load cell and hydraulic brake pedals.
Force Feedback (FFB) Settings
There are two important areas needed to be checked when adjusting FFB settings.
- First – The steering wheel software installed on your PC
- Second – iRacing settings located in the options menu
Optimal FFB Settings
The optimal FFB settings forum thread should have all the up to date information you’ll need:
http://members.iracing.com/jforum/posts/list/1500238.page
Min Force Setting
To be able to determine the proper Min Force settings is to use the Wheel Check tool located here:

Written, Composed and Illustrated by Michael Schrader
© 2018 Old Bastards Racing League